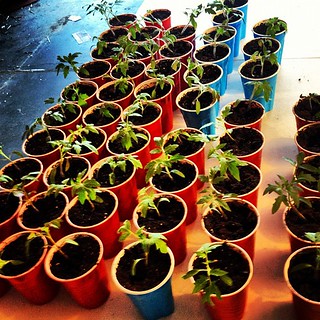
I began by taking a large nail and poking holes in the bottom of the cups for drainage. After about...oh...24 cups worth of poking and stabbing my hand I had the bright idea of drilling holes. I found the perfect drill bit in my tool chest (3/16"), attached it, and drilled six holes in a stack of cups. The remaining cups went much quicker!
With the draining holds drilled, I filled them up 3/4 of the way with a good potting soil. We purchased a miracle-grow variety. While we could have made our own (and may do so in the future) it was both convenient and helps the plant since we bought a kind that has fertilizer in it. This will help the plant grow before we transplant it outside, but also once we put it in the ground. It will help them get a head start. NOTE: make sure you use potting soil and not top soil or garden soil. The latter two choices tend to compact as they dry which will make it difficult for new plants to develop a strong root system.
Cup...check. Soil...check. Next, we carefully pulled the netting off the pellets, making sure not to rip any roots that might have grown out. After placing them in the center of a cup, we took some soil and put it around the plant, covering the plant to the top of the cup. NOTE: if you are transplanting tomato plants, you can "bury" them up to their first set of true leaves (the first set of leaves that grow from the stem as opposed to the leaves that pop out of the seed). If the stem of a tomato is buried (or is even in contact with soil) it will start to produce roots. Burying the plant to the first true leaves allows the plant to develop an incredibly strong root system and withstand high winds (which are frequent in Southern Indiana). I have not read any information as to whether one can do this with other plants. If you have, please let me know!
Lastly, we lightly tamped the soil around the plant with our hands and put half a cup of warm water in it. When we transplant into the garden, we'll water with a transplant nutrient additive which will help prevent any kind of transplant shock and will stimulate root growth. I didn't do that this time since the plants. I may try it next time and see if there is a noticeable difference. Once they were watered, they were placed under our grow lights and left alone.
The whole thing was pretty easy, honestly, although time consuming since we have so many plants. My father, who has lung cancer and worsening dementia, is staying with us right now while my mom recuperates from surgery. I have to say that this project was very cathartic for me. I was able to get away, throw on some music on the iPhone, and plug away with dirt and plants. That may be one thing I love about gardening. I am able to get away from the busyness that is life in the modern world, listen to some music (or just the birds and bugs), and plug away in creation and tending to garden life...even garden life in a semi-urban world.
No comments:
Post a Comment